

Showing posts with label how-to. Show all posts
Showing posts with label how-to. Show all posts
Thursday, February 19, 2009


 Kate Cannon
Sunday, August 10, 2008
I haven't forgot about you all

This is a picture from a beautiful organic farm in Vermont, that I took on our road trip.
I have been so busy over the past month that I have not had the time or energy to post. I have been back in school since July 14th, and the girls started back on Aug. 1st. I have been crafting. I have made a baby blanket, a sample scarf for a kit that I am making up. I made a quick lap blanket for the house, and 7 balloon valances for the school that the girls go to. I have also been working on finding a job. I feel that I have not been keeping this up a well as I should be anymore. I will come back and post when I can. The last time I said that I was taking a break I ended up posting like crazy for a while. I thank you for reading. I really plan on posting as often as possible.
I have been going nuts over at YouTube lately. I am able to watch it on my phone and I have found a few that I would like to share.
Thursday, January 31, 2008
Layout of the day

This picture was taken on New Years Day. It was a sunny cool day and I wanted to take a few pictures out side.
How To:
I created the flower with a couple of patterned papers and clip art in a flower shape. I overlaid the paper with the help of a vector mask. Then I used the mosaic filter to change the look of the paper varing the size of the tiles and the grout. I then added a button embelishment on top for the center.
The Scallop paper border was created with a vector mask also. The shape was created in photoshop and then the patterned paper was laid over it with the vector mask switched on to shwo the scallop shape.
The frame was created with a layer mask painted white, and the photo was placed on top of it.
All of the elements and papers are freebies that I have downloaded from various sources.
I am working on a few designs of my own and I have a kit in progress and I am looking for people who would like to design a couple of page layouts with the papers and elements that I have made.
Sunday, January 20, 2008
The Camera's Back
I found my camera cord so I can finally post my pictures. So be warned this will be a picture heavy post.


Here are a few of the cards that I have made over the past few weeks. The first two were welcome back cards for the girls teachers. I made them little bags of nugget candy with welcome back on the lables and a card each. I used stamps from a kit that I bought at Michael's it was a huge collection that came with ribbon, ink pads, chalk, wood mounted stamps, markers, paper, stickers, and more. The paper for these cards is All Dressed Up and I used a 1 1/2 in scallop circle punch, with a 1 inch circle layered on top.

The letter stamps that I used for this card are from all night media, the brads are making memories, the stickers are from hobby lobby, and paper is just a blue scrapbook cardstock, I inked the bottom section with distressing ink from the making memories distressing kit.
It is getting late so I will post a few more pictures tomorrow.
Sunday, December 23, 2007
A Couple of Quick Gifts
Start with to store bought fleece blankets (with blanket stitch edge), a little cotton yarn, and some felt.
 Cut out 3 inch squares out of 4 colors of felt and 3 inch triangles out of the same colors. Then sew the squares on with a straight stitch 1/8 inch from edge of felt in each corner of the blanket and the center place the triangles.
On the other one Double crochet, chain, in each blanket stitch bar around the edge of the blanket and then finish off with a slip stich and weave in ends.
I made both of these in under 1 1/2 hours. They were very quick and easy to complete.
Merry Christmas To All
I think I might be too busy to post over the next few days.
So, here goes, MERRY CHRISTMAS I hope that you all have a good one. I have included a few of our new ornaments that we have aquired over the past few weeks.
 The Star is from Khols and the Strawberry is from Bloomingdale's
The Snowman bell is from Kohl's and the Good Night Moon is from Bloomingdale's. the Gingerbread Man is one that Anastasia made in Kindergarten last year.

Here is one of my most recent cards. I used the Making Memories Distressing kit and a Marvy 1' circle punch and one blue snap. I set the snap with the fisker's eyelet setter and punch. I also used an ink'ed phrase stamp for the happy birthday.
Saturday, December 22, 2007
A Cool How-To

I really love this how to at this site and all the other ones that are on there also. This picture from there also. I just thought I would give a little inspiration for today.
Tuesday, December 18, 2007
Gingerbread and Christmas Cleaning
 Today has been spent cleaning out my cabinets and my counters and getting it set up for the luncheon that we are hosting on Christmas Eve.

Here is a picture of our gingerbread house that we made last week. We had to decorate the roof flat while the rest of the house parts dried.
 Shae and I also made a batch of Peppermint Bark. She got to use the hammer to crush the candy canes and she loved it.
  This is the recipe that I use. It is my own and I really like the way it tastes.
12 oz of vanilla bark
12 candy canes crushed
4 drops of peppermit extract
Melt the vanilla bark in the microwave until smooth in 15 sec. spirts. Mix in candy canes and extract. Spread on parchment paper on a cookie sheet and chill to harden. Then breakup into pieces. enjoy
Monday, December 17, 2007
School Is Over For The Year
 I finished my classes on Saturday and the girls on Friday. I have been going crazy this weekend making a few things and letting the girls make collages. I bought myself a new cabinet to store my craft stuff that we use in the house so I don't have to carry things back and forth from the studio. It is a Making Memories Embelishment Cabinet, Michael's had then on sale for 30% off and I just had to have it. It has been great. I have things for paper crafting, stamping, scrapbooking, and beading all in one cabinet. It has made keeping things organized and easy to get to. Look at all the storage space. I love the ribbon rods, I thought I had more ribbon than this, I will have to look through a few more drawers. I have the jars filled with floss, buttons, beads, paper scaps, paint daubers.

Here is one of the scrapbook pages that I made last night. This one is Shae's first trip to Stone Mt. in 2003.
Supply list:
Black Dye Ink Pad
Blue Eyelet Snaps
Forest Green Cardstock
Round Journaling Stamp
Flourish Stamp
Tree Stamp
Green Crinkle print paper
All Night Media Typerwiter Key Letter Stamp Set
Dark Blue Ink Dauber (used to distress the edges of paper)

Anastasia's first year in school.
Supply List:
Paper Flowers K & Company
Large Brads K & Company
Fabric Stickers
Making Memories Heart Brads
K & Company Chipboard accents
Plum Ink Dauber
Scallop Scissors
Round Journaling Stamp
Striped Pattern paper
Pink Cardstock
I also got an early christmas present. I bought my self a new camera. It is a Sony Cyber-Shot DSC-S700. Circuit City had it on sale for $20 lower than wal-mart and they gave a 1G memory stich with purchase. Yipee, my last one fell in the atrium waterfountain at the Georgia Aquarium, this summer.
Here is the list of books and magazines that I have used to get some ideas for my paper crafting.
Vintage Paper Crafts
The Decorated Page
The Encyclopedia of Scrapbooking Tool & Techniques
Wednesday, October 17, 2007
Things that I find Inspiring
I just thought that I would give you a little taste of what has inspired me today.
 These are ribbon belts that I found via Martha Stewart.com
  Photo Jewelry also via Martha Stewart.com
  Strawberry Pincushions from Martha Stewart.com
These are ribbon belts that I found via Martha Stewart.com Photo Jewelry also via Martha Stewart.com Strawberry Pincushions from Martha Stewart.com and last but not least Yarn Gift Wrapping also from Martha Stewart.com
Monday, October 15, 2007
Friday, August 17, 2007
Braclet Bag Pattern
Bracelet Bag Pattern:
Crochet hook : G
Yarn: Any Cotton DK weight
Pattern:
Chain 4
round 1: 12 dc in the 4 chain from hook join with a slip stitch chain 3.
round 2: 2dc in each stitch around (24 stitches) join with a slip stitch, chain 3.
round 3: *1dc, 2 dc in next two stitches * repeat around, join with slip stitch, chain 3.
round 4: 1dc, 2dc in next stitch repeat around, join with slip stitch, chain 3.
round 5: 1dc in the back loop of the previous round stitches around, join with a slip stitch, chain 3. (this round with start the sides of the bag)
Round 6: 1 dc in each stitch around, join with slip stitch, chain 3.
Repeat round 6 for 9 rounds.
Round 15: 1 dc in each stitch around, join with slip stitch, chain 2
Round 16: sc in the next 4 stitches, chain 10 skip next 4 stitches, sc in next 8 stitches, chain 25, skip next 4 stitches, sc in next 4 join with a slip stitch, chain 4.
Finishing round: sc around and in all chain stitches, slip stitch the end and finish off.
Pictures to Follow.
Sunday, July 8, 2007
An unlucky, lucky day
I will say that 7-7-07 was unlucky for my Digital Camera. We took the girls to the new World of Coke, and the Georgia Aquarium yesterday and while I was sitting on the side of the fountain I stood up not thinking that my camera was in my lap. When I stood up it sliped off and into the fountain. So there is no camera for now and so I will posting pictures that I have taken over the past month. I always take more than I ever post, because I do not like posting without pictures. I do have some that I hope to get posted and I wish I could have gotten the ones off that I took yesterday, (if there is anyone out there that knows of a way to get pictures off the camera please let me know).
Here is one of the crochet flowers that I make. I chain 5 and then join with a slip stitch, I then 10 double crochet in the center, then I (chain 6, single crochet) repeat in every other stitch until you are around the center. then finish off and weave in ends. glue on either a pin back or a hair clip.
Saturday, July 7, 2007
Fabric and Yarn Dolls
Here are a couple of finished objects that me and the girls made together. We got the idea from the show "That's Clever" on HGTV. I had the items on hand that we needed to make it so we made a couple. I have now made another one but I forgot to take a picture of it yet.
 Shae really likes blue so we picked fabrics with a lot of blues in it and yarns that were mostly blue, I have a small amount of Noro left over and that is what the doll is wrapped with. I like the way the color changed for yellow to green.
 This it the one Anastasia made. Her favorite color is pink and so we used various colors of pink. We wrapped the dolls body with a light and fluffy pink yarn and the hair is scraps of yarn that was trimmed from the skirt to neaten it up.
The supplies for this project are:
- An old white t-shirt, men's size XL (makes 3 dolls from one shirt)
- Florist wire (silver color is easier to cover and does not show like the green wire does)
- Scrap fabric
- leftover yarns
- ribbon
- Your choice of embellishments
How-to, to follow.
Thursday, June 28, 2007
Some Great How-To's
I thought I would list a few links that I have been enjoying lately.
I subscribe to the Cut Out + Keep Podcast and I really love there projects.
I really like the Fabric Ball Necklace, I can think a few other uses for the fabric balls, like tie-backs for curtains, a garland for a party, and I can think of a few more.
Crafty Daisies has some great how-to's and I think that this one (on Paper Making) is a great one for crafting with the kids. I really love this Tree tote bag and it seems so easy to make.
Instructables has a great selection of how-to's and you can even post your own if you would like. Here is a great Contest for you to enter if you think that you can make something cool out of office supplies all you have to do is document your steps with photos and post it.
Adorn Magazine has a great how to for a Passport Wallet and a whole section of Web-Only Projects.
I love Molly Chicken and the tutorials here are great I have made a few of the fabric flowers.
I hope that you enjoy these links. I wanted to share the ones that I have found very useful.
Sunday, March 18, 2007
This Week's FOs and a pattern

This was one of the first FOs of the week. I made 5 of them with leftover sock yarn. I also made a couple of them with buttons for a gift and I gifted them without taking a picture. These were very fun and easy and a great way to use up those little marble size balls that you have been hanging onto and did not know what to do with.
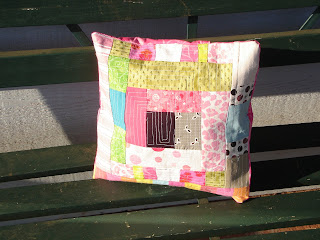 This pillow was so much fun. I had seen so many of these around blog land that I just had to have a log cabin pillow of my own. I am not very good at throwing away even the smallest pieces of fabric. I got a few Denise Schmidt's fabric pieces in a swap and so I incoorporated a few of the pieces in and I love the way it turned out. It is now sitting on my couch. My daughter wanted it for her room, but I had to have it for my seat.
 I had to put something on to decorate the back so that it would still look cute even when the pillow is on the wrong side. I also made the pillow form for the inside.
  I am a member of the April Fools Swap on Swap-bot and you had to make a handbag that is whimsical and cute so I made the bag out of some fabric from my stash and a few buttons that match, the ribbon is vintage and I sewed a flower with yarn on the front to add too the whimsey. This was very fun to make with the buttons that match perfectly.
PATTERN:
I used a 3.5 hook and chained 5 joined in a ring and then then 10 sc in the ring then join with a sc . Next row chain 4 sc in next stitch, repeat around and then finish off. Cut yarn and weave in ends.
This pillow was so much fun. I had seen so many of these around blog land that I just had to have a log cabin pillow of my own. I am not very good at throwing away even the smallest pieces of fabric. I got a few Denise Schmidt's fabric pieces in a swap and so I incoorporated a few of the pieces in and I love the way it turned out. It is now sitting on my couch. My daughter wanted it for her room, but I had to have it for my seat.I had to put something on to decorate the back so that it would still look cute even when the pillow is on the wrong side. I also made the pillow form for the inside. I am a member of the April Fools Swap on Swap-bot and you had to make a handbag that is whimsical and cute so I made the bag out of some fabric from my stash and a few buttons that match, the ribbon is vintage and I sewed a flower with yarn on the front to add too the whimsey. This was very fun to make with the buttons that match perfectly. Monday, January 22, 2007
Whip-up Inspired
Here is the completed box that I ended up covering with some scrapbook paper leftover from another project. 
 I have been looking at this for the past few days and I just had to make one of my own. I used what I had on hand and so the box will be covered tomorrow with fabric and I did find enough magazine order cards to make the address cards. I used index cards for the dividers and left over scrapbook letters for the alphabet. The box is half of a band-aid box and I plan on using the other half for another one. It was very time consuming I worked most of the day cutting the cards and about 30 min cutting and labeling the dividers. I started looking for a box or a container for the cards and I found the box almost empty in the cabinet.
Here are the in process pictures.
 I used a standard business card as the size for each address card as my template. The size is 2" x 3.5"
 Here are the address cards. This was the fun part, I enjoyed deciding where the placement of the color and the design of the cards.
 The measurments on the dividers is 4"x 3" to the top if the tab.
I hope that this helps anyone out there who is like me and would like to recycle their own version. I know that in no way is this as good as the original it will work for my use on my desk. I hope to be able to keep track of my swap addresses and help me when I want to send a thank you to someone who has helped me out in the blog world.
Subscribe to:
Posts (Atom)


