Showing posts with label art. Show all posts

Sunday, February 24, 2008

Digital Scrapbook Kits


I will be posting some new digital scrapbook kits this week. I have started a blog just for my designs and it is called Paper Kate. I am really enjoying creating these kits. I have posted a sneak peek of one of the papers that I have created for the kits Grunged Out. There is also a sample layout using this Grunged Out kit.

The Quote is a freebie from Designer Digitals, and the font is a free font from Two Peas.

Monday, February 4, 2008

Layouts of the Day


I did not realize that I had not posted the past few layouts that I have made. I have them posted in my scrapbook galleries, but I forgot to post them here. Please let me know what you think I really would love some feedback on these. Thanks so much in advance for your replies.

Sunday, February 3, 2008

Featured Site

I would like to start featuring sites once per week. The first featured site is The Shabby Princess.

This site has all you need to get started Digital Scrapbooking, with great how-to's and freebies. The Dinner Party kit is one of the great freebies that are avaliable on this site.

The shoppe is filled with beautiful papers, embelishments, fonts, and kits.
You can also find great premade blog headers and buttons. All you have to do is add your blog title, and you have a great header.

Even if the digital scrapbook medium is not for you this is great for digital collage and other types of art because you can print these images out with your home printer and use them for any traditional crafting.

Friday, February 1, 2008

Digital Scrapbook Paper

I have just completed my first set of Digital Scrapbook paper. I am working on the embelishments to go along with it. I have ribbon, tags, and flowers in the works. Please let me know what you think about them I will be posting layouts using them as soon as I can.

Monday, January 28, 2008

Sunday, January 27, 2008

A New Layout


I just finished this new layout and I wanted to share. This one is from my vacation back in September. I go on a Ladies' Retreat with the ladies from our church for a week every year to Myrtle Beach, South Carolina. This is another layout using only the freebes from Designer Digitals.com.

Sunday, January 20, 2008

The Camera's Back

I found my camera cord so I can finally post my pictures. So be warned this will be a picture heavy post.

Here are a few of the cards that I have made over the past few weeks. The first two were welcome back cards for the girls teachers. I made them little bags of nugget candy with welcome back on the lables and a card each. I used stamps from a kit that I bought at Michael's it was a huge collection that came with ribbon, ink pads, chalk, wood mounted stamps, markers, paper, stickers, and more. The paper for these cards is All Dressed Up and I used a 1 1/2 in scallop circle punch, with a 1 inch circle layered on top.

The letter stamps that I used for this card are from all night media, the brads are making memories, the stickers are from hobby lobby, and paper is just a blue scrapbook cardstock, I inked the bottom section with distressing ink from the making memories distressing kit.

It is getting late so I will post a few more pictures tomorrow.

Sunday, November 18, 2007

What I have been up to this week.


School has been taking up so much of my time this week. I thought I would see what you think about some of my drawings.

I had to draw this chair and chest of drawers for my History of Furniture class.

Monday, November 5, 2007

Zentangle

Ok I saw this on another blog the other day and I had to try my hand at one. Once I got started I realized that I used to make these alot when I was in school. I really like the way that this one turned out. Here is a link to the Zentangle Gallery.

Tuesday, May 29, 2007

Whiplash May

I decided to post this for the whipup contest for May.

I made this as an art quilt to hand on the wall of my studio. I serged the edges and I tried out diffrent techniques out on this quilt. I decided that is would be easier to make the flower on a small scale to try it out before I commited to making a larger version for my daughter's bed. To add interest I did not keep the edge straight, I added the element of the wave to the edge to give the element of movement.

I added a beaded head pin to the letter "A" for something a little different. I put the word ART on it because I feel that I use the space for more that just one medium. I create so many diffrent things and I love the concept that I get to creat art.

whipup

Tuesday, April 10, 2007

What I have been up to lately (picture heavy post)

I have been very busy over the last week. So here is a few pages from my illustrated journal. I picked up a journal last week at Barnes and Noble and Have been going crazy ever since. I love the graph paper pages they seem so artsy.
I also got the itch to start beading again, as I did it in my pre-blogging days. Here is a few of the earrings that will be in the shop in the coming days. You can clink on any of the pictures for a larger view.

Wednesday, March 28, 2007

Whats in the shop now

Wednesday, March 14, 2007

Digital Collage


I have been playing around with Photoshop and I love the way that this medium is so much fun. I have created this digital collage today, and I thought I would post it here.

Monday, January 29, 2007

New Sketches


I decided that I would post a couple of my sketches that I have done for school. So here are a few of the renderings that I have completed for the project.

Thursday, January 25, 2007

A view into my studio

I have had my current studio for about 4 1/2 months now and I am still trying to get everything where I want it. I have rearranged about 100 times it seems. Over Christmas I had an open house to let people see where I teach my classes. So I had it arranged for that, so I decided to arrange it for classes and for me to be able to work better.

Here is part of my ribbon collection on the bottom is my vintage ribbon and seam binding and the white on the top is also vintage and I have some of my new ribbon. This is on top of a old dresser that my aunt gave me, someone had started to refinish it and only removed the paint from the top and so I decided that I liked the way it looked so I have left it that way.
Here is what is sitting on my desk.
I also made a couple of baby comfort blankets with ribbon tags.

Wednesday, January 24, 2007

Crafting Update

I have an updated picture of my recycled address file.
More Recycled crafting. This is my cereal box gift box. I am in a swap and I like to package each element in its own box and this is the way that I am able to do it. I use the Candy Box Template from Mirk wood designs for these boxes. I also use these boxes for my Crafty Collage Box that I sell. Each of these collage boxes boxes have over 12 different types of items in them and I will post a picture as soon as I get a day were I can get good light. It has been gray and cloudy for the past week here. I hope I don't go blind when the sun comes out again. :-)

Tuesday, January 23, 2007

Lack of crafting today

I have been sitting here reading my textbook and thinking that I wish that I was crafting with my girls. I cut a chunk out of my knuckle with a rotary cutter and my finger is throbbing and I can't really move it. I am sitting here typing with one hand.
I set the girls up to make rocks to put on Chester's grave. Shae painted her's yellow then decided to put red on one side and blue on the other side and well when they mixed with the yellow we ended up with green/yellow/orange. My DH thought it looks like the mexican flag. She had so much fun painting it. Anastasia's contribution to the rocks was a red/blue/pink/yellow/gray one and she did not mix the colors you can see distinct separation of the colors on hers. I had to paint the name and a flower on each of them. Shae wanted me to add a heart and a few dots to her's. They wanted to make something to "give" Chester.

Monday, January 22, 2007

Whip-up Inspired

Here is the completed box that I ended up covering with some scrapbook paper leftover from another project.
I have been looking at this for the past few days and I just had to make one of my own. I used what I had on hand and so the box will be covered tomorrow with fabric and I did find enough magazine order cards to make the address cards. I used index cards for the dividers and left over scrapbook letters for the alphabet. The box is half of a band-aid box and I plan on using the other half for another one. It was very time consuming I worked most of the day cutting the cards and about 30 min cutting and labeling the dividers. I started looking for a box or a container for the cards and I found the box almost empty in the cabinet.


Here are the in process pictures.
I used a standard business card as the size for each address card as my template. The size is 2" x 3.5"
Here are the address cards. This was the fun part, I enjoyed deciding where the placement of the color and the design of the cards.
The measurments on the dividers is 4"x 3" to the top if the tab.
I hope that this helps anyone out there who is like me and would like to recycle their own version. I know that in no way is this as good as the original it will work for my use on my desk. I hope to be able to keep track of my swap addresses and help me when I want to send a thank you to someone who has helped me out in the blog world.

Thursday, January 4, 2007

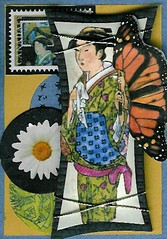
ATCs


madame butterfly 3
Originally uploaded by TwoDresses.
I have been very interested in ATCs Artist Trading Cards for the past year and I am now in the process of making some up for a Fiber Arts Presentation that I am involved with. This event is for the Entire group of Elementary Art Teachers in my county. I am a little Nervous but I am looking forward to it. I will be demonstrating how raw wool is processed into yarn, and we will be making fabric ATCs. This ATC is one that I found on the flickr group dedicated to ATCs and I loed the way it looked so muc that I thought I would share.